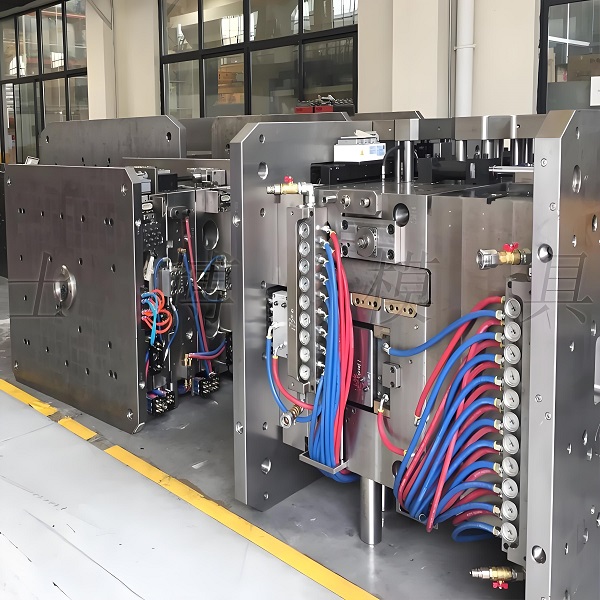
Before injection molding with a new mold or when replacing the machine with another mold for production, mold testing is an essential part. The quality of the trial mold results will directly affect the smoothness of the factory's subsequent production. Therefore, it is necessary to follow reasonable operating steps and record useful technical parameters during the trial molding process to facilitate mass production of products.
1. Understand the relevant information about the mold:
It is best to obtain the design drawings of the mold, analyze them in detail, and arrange for the mold technician to participate in the trial mold work.
2. First, check the mechanical coordination action on the workbench:
Pay attention to whether there are scratches, missing parts, or looseness, whether the mold moves towards the skateboard accurately, whether there are leaks in the water and air pipe joints, and if there are restrictions on the opening of the mold, they should also be marked on the mold. If the above actions can be done before hanging the mold, it can avoid the waste of time caused by discovering problems during hanging and dismantling the mold.
3. After determining that the actions of each part of the mold are appropriate, it is necessary to choose a suitable trial mold injection machine. When selecting, attention should be:
(c) Does the maximum movement distance of the activity template meet the requirements
After everything is confirmed to be fine, the next step is to hang the mold. When hanging, be careful not to remove the hook before locking all clamping templates and opening the mold to avoid loosening or breaking the clamping templates and causing the mold to fall off. After the mold is installed, the mechanical movements of each part of the mold, such as the sliding plate, ejector pin, tooth retraction structure, and limit switch, should be carefully checked for accuracy. And pay attention to
whether the feeding nozzle is aligned with the feeding port. The next step is to pay attention to the mold closing action. At this time, the closing pressure should be lowered, and during manual and low-speed mold closing actions, pay attention to whether there are any unsmooth movements or abnormal sounds. The process of lifting molds is actually relatively simple, and the main area that needs to be careful is the difficulty of aligning the center of the mold gate and nozzle. Usually, the center can be adjusted using test strips.
4. Increase the mold temperature:
Select an appropriate mold temperature control machine based on the properties of the raw materials used in the finished product and the size of the mold to increase the temperature of the mold to the required temperature for production. After the mold temperature increases, it is necessary to re-examine the movements of each part, as steel may cause mold jamming due to thermal expansion. Therefore, attention should be paid to the sliding of each part to avoid pulling and vibration.
If the experimental plan rule is not implemented in the factory, we suggest adjusting only one condition at a time when adjusting the trial mold conditions, in order to distinguish the impact of a single condition change on the finished product.
6. According to the different raw materials used, bake them moderately.
7. Trial molding and future mass production should use the same raw materials as much as possible
8. Do not completely test the mold with inferior materials. If there is a color requirement, color testing can be arranged together.
9. Internal stress and other issues often affect secondary processing. After the mold is tested and the finished product is stable, secondary processing should be carried out. After the mold is slowly closed, the closing pressure should be adjusted and operated several times to check for uneven clamping pressure, in order to avoid burrs and mold deformation in the finished product.
After checking all the above steps, lower the mold closing speed and pressure, and set the safety buckle and travel distance, then adjust the normal mold closing speed and speed. If there is a limit switch involving the maximum stroke, the mold opening stroke should be adjusted slightly shorter, and the high-speed mold opening action should be cut off before the maximum mold opening stroke. This is because during the entire mold opening process, the high-speed action stroke is longer than the low-speed one. The mechanical ejector rod on the plastic machine must also be adjusted to operate after the full speed mold opening action to prevent deformation of the ejector pin plate or peeling plate due to force
Please check the following items before making the first injection:
(a) Is the feeding process too long or insufficient.
(b) Is the pressure too high or too low.
(c) Is the filling speed too fast or too slow.
(d) Is the processing cycle too long or too short.
To prevent short shots, breakage, deformation, burrs, and even damage to the mold in the finished product. If the processing cycle is too short, the ejector pin will pierce through the finished product or peel the ring, causing damage to the finished product. This type of situation may take you two to three hours to retrieve the finished product. If the processing cycle is too long, the thin and weak parts of the mold core may break due to the shrinkage of the rubber material. Of course, you cannot predict all the possible problems that may occur during the trial molding process, but thorough consideration and timely measures taken in advance can help you avoid serious and expensive losses.
The main steps of trial molding
In order to avoid unnecessary waste of time and trouble during mass production, it is necessary to patiently adjust and control various processing conditions, find the best temperature and pressure conditions, and develop standard trial molding procedures that can be used to establish daily work methods.
1. Check whether the plastic material in the barrel is correct and whether it has been baked according to regulations (if different raw materials are used for mold testing and production, different results may be obtained).
2. The cleaning of the material pipe should be thorough to prevent inferior or miscellaneous materials from entering the mold, as inferior or miscellaneous materials may cause the mold to get stuck. Check whether the temperature of the material tube and the temperature of the mold are suitable for processing the raw materials.
3. Adjust the pressure and injection volume to produce a finished product with satisfactory appearance, but do not run burrs, especially when there are still some molded products that have not fully solidified. Before adjusting various control conditions, you should think about it, because a slight change in the filling rate may cause significant filling changes.
4. Be patient until the conditions of the machine and mold stabilize, even medium-sized machines may have to wait for more than 30 minutes. You can use this time to check for possible issues with the finished product.
5. The time for the screw to advance should not be shorter than the time for the plastic at the gate to solidify, otherwise the weight of the finished product will decrease and the performance of the finished product will be compromised. And when the mold is heated, the screw advance time also needs to be appropriately extended to compact the finished product.
6. Reasonably adjust and reduce the total processing cycle.
7. Run the newly adjusted conditions for at least 30 minutes until stable, and then continuously produce at least one dozen full mold samples. Mark the date and quantity on their containers, and place them separately according to the mold cavity to test their actual stability and derive reasonable control tolerances. (Especially valuable for multi hole molds).
8. Measure and record the important dimensions of continuous samples (wait until the samples cool to room temperature before measuring).
9. Compare the dimensions measured for each mold sample, paying attention to:
(a) Is the product size stable.
(b) Is there a tendency for certain dimensions to increase or decrease while indicating that machining conditions are still changing, such as poor temperature control or oil pressure control.
(c) Is the change in size within the tolerance range.
10. If the size of the finished product does not change much and the processing conditions are normal, it is necessary to observe whether the quality of the finished product of each the first mock examination cavity is acceptable and its size can be within the allowable tolerance. Record the mold hole numbers that are continuously measured, larger or smaller than the average value, in order to check whether the dimensions of the mold are correct.
Record the parameters obtained during the trial molding process
Record and analyze data as necessary for modifying molds and production conditions, and as a reference for future mass production.
1. Make the processing operation time longer to stabilize the melt adhesive temperature and hydraulic oil temperature.
2. Adjust the machine conditions based on whether all finished product sizes are too large or too small. If the shrinkage rate is too large and the finished product appears to have insufficient material injection, it can also be used as a reference to increase the gate size.
3. If the size of each mold cavity is too large or too small, it should be corrected. If the size of the mold cavity and the doorway is still correct, then try to change the machine conditions, such as the filling rate, mold temperature, and pressure of each part, and check whether some mold cavities are filling slowly.
4. Depending on the fit of each mold cavity or the displacement of the mold core, individual adjustments may be made. It is also possible to adjust the filling rate and mold temperature again to improve its uniformity.
5. Check and modify the faults of the injection machine, such as poor oil pump, oil valve, temperature controller, etc., which can cause changes in processing conditions. Even the most perfect mold cannot maintain the good work efficiency of the poor machine. After reviewing all recorded values, keep a set of samples for proofreading and comparison to see if the corrected samples have improved. Properly preserve all records of sample inspection during the trial molding process, including various pressures during the processing cycle, melt adhesive and mold temperature, material tube temperature, injection action time, screw feeding period, etc. In short, all data that will help establish the same processing conditions smoothly in the future should be preserved in order to obtain products that meet quality standards.
At present, the mold temperature is often ignored during factory mold testing, and it is the most difficult to control the mold temperature during short-term mold testing and future mass production. Incorrect mold temperature can affect the size, brightness, shrinkage, flow patterns, and material shortage of the sample. If a mold temperature controller is not used to control it, difficulties may arise during future mass production.
 Before injection molding with a new mold or when replacing the machine with another mold for production, mold testing is an essential part. The quality of the trial mold results will directly affect the smoothness of the factory's subsequent production. Therefore, it is necessary to follow reasonable operating steps and record useful technical parameters during the trial molding process to facilitate mass production of products.
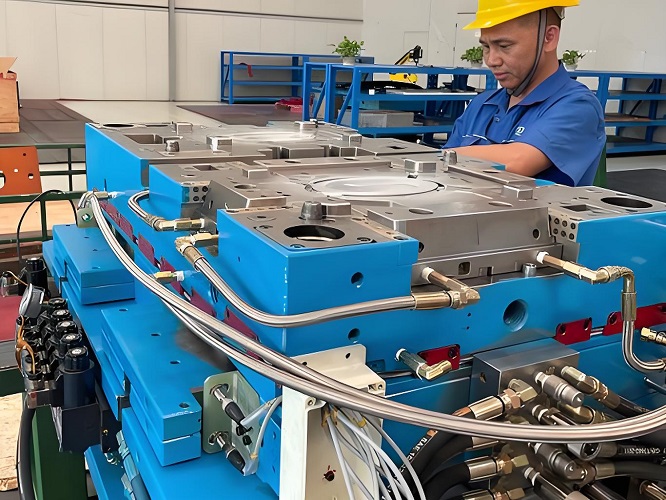 After everything is confirmed to be fine, the next step is to hang the mold. When hanging, be careful not to remove the hook before locking all clamping templates and opening the mold to avoid loosening or breaking the clamping templates and causing the mold to fall off. After the mold is installed, the mechanical movements of each part of the mold, such as the sliding plate, ejector pin, tooth retraction structure, and limit switch, should be carefully checked for accuracy. And pay attention to